User Manual.
This manual describes the functions
of the LightSpectra app. It assumes you have already
performed the basic operations described in the
quick-start guide.
Introduction
Light sources can emit
over a range of wavelengths depending on the
materials that are being excited.
Below is shown a schematic of a basic spectrometer
using a transmission diffraction grating.
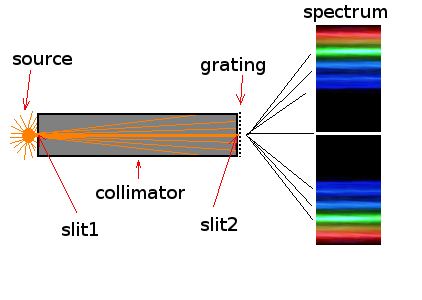
The light source produces light in all directions.
The collimator
will absorb all rays except the horizontal ones that
travel through both slits. The light exiting the
second slit will then travel through the diffraction
grating where interference will cause the
wavelengths to split.
Here is the spectrometer I used to generate the
example spectrum that came preloaded with
the app.


The collimator was made from a tube of lip balm with
two narrow (<1mm) slits cut on either side. The
inside was colored black with a marker. Over the
slit on the cap, I taped a 360 lines/mm grating
film. You can buy them online for about $1 plus
shipping. One of the main reasons I used this
tube is because it detaches into two parts. It makes
it much easier to line up your slit with your
camera. I put the small cap over top of the camera
and made sure I could see multiple images through
it, taped it on, then put the rest of the tube onto
the cap.
There are many good designs you can find on the
internet for home-made spectrometers. Some are
designed such that all you will see on your camera
are the first order diffracted images, no central
line. These are preferable for higher resolution in
the region of interest. The design I used will show
the central line as well as the first order
spectrum. I find this is preferable for image
stability. You can use either type with this
program. You just need to make sure you choose the
appropriate calibration.
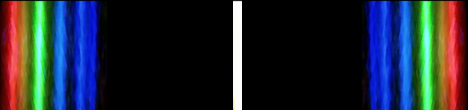

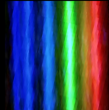
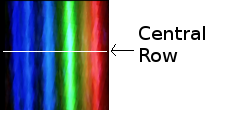
Spectra
with center lines
Spectrum
with no center line
A number of designs available on the web will use
part of an old CD as the diffraction grating.
While it is possible to do this, I find the
transmission film preferable mainly because the
diffraction grating on the CD is curved which leads
to curved spectra.
While the software is designed to compensate for
some curvature when calculating the maximums, it can
only do so much. Try to make the lines as straight
as possible. So if you do use a CD for the grating,
try to use the outer edge where it is the
straightest. Then when you take your images, crop to
a small region.
The better job you do on
constructing the spectrometer, the better
results you will have.
Getting an image
You have two options with this app, you can use the
built in camera (paid version
only), or you can use your favorite camera
app, then load this image (as per the example in the
quick-start guide).
You can load as many images as you want, they will
be placed in their own tabs. [Multiple
tabs available only in paid version]
Examining the image
There are some options for
manipulating the image (in the main menu):
-Mirror horizontally:
Unnecessary for spectra with central line. For
no central line, make sure the lowest wavelength
is the leftmost one.
-Crop to View: Use this
for spectra with central lines. Do this after
you zoom in to have spectrum centered. (The
spectrum must be relatively centered in order
for the program to find the maximums).
-Crop
to Height: Use this for spectra with no central
lines, otherwise your calibration will be thrown
off.
-Show full spectrum:
Just goes back to full view for this crop.
-Generate Report: After
the lines are calibrated. This will create a pdf
report of the current spectrum, listing values
of each maximum, will attempt to open your
default pdf reader. [Available
only in paid version]
*Note, you can zoom in to your
image as much as you want. But the calculations
will be performed to the last cropped image.*
On the tab there are a number of buttons showing
position of maximums, and total, red, green and blue
intensities. When any of them are clicked the image
will be automatically analyzed and the maximums will
be calculated. You may notice that the maximum lines
may not line up exactly with the peaks you see and
there may not be one for each peak. This is because
the total intensity displayed is from the spectrum
across the central row. Whereas the distances of the
maximum lines may be calculated from the average of
a number of rows. It also depends on the smoothing
and minimum intensity settings.
Calibration
There are four calibration options and it is
important to understand the difference between them.
The position of the spectrum and location on your
screen depends on a number of factors:
-The distance of
your spectrometer to your camera lens.
-The grating size in your spectrometer.
The grating I used is ruled at 360 lines/mm,
and I have set this to the parameters default
value.
-The angle of your spectrometer to your
camera (ideally it should be perpendicular,
but the calibration accounts for any angle).
-Are you examining a spectrum with or without
the center line?
In some detail:

Below is a table to summarize the
calibrations required
System
|
Calibration Required
|
Central Line, Grating
Known
|
2 Line Calibration With
Center
|
Central Line, Grating
unknown
|
3 Line Calibration With
Center
|
No Central Line,
Grating Known
|
3 Line Calibration No
Center
|
No Central line,
Grating unknown
|
4 Line Calibration No
Center
|
In addition, you can set the
grating size manually by choosing from the main
menu "calibration->set grating size".
After calibration, you may save these values and
load them again next time so you don't have to
recalibrate. However, if you do this you must be
careful to ensure the system hasn't changed.
The benefit of using the center line is that you can
zoom in and crop your image to where you like (as
long as the center line remains in the crop). The
program will automatically detect it for each
image and all the rest of the lines will be measured
relative to their center lines. In that way it is
rather robust if your spectrometer gets moved a bit.
The disadvantage of having the center line is that a
lot of your image real-estate is filled with empty
space. You will have a more limited resolution on
the more interesting part of the spectrum.
When you don't have a center line, (directly from your spectrometer,
not digitally zoomed in to remove the central line)
you will see more detail and more peaks. Again, you
can calibrate in this case too following the table
above. However you have to be more careful with the
system now. There is no center line for the program
to automatically calibrate to. It will not use
relative positions to the center. It requires all
pictures used under this calibration to not have
been cropped in the horizontal direction. In this
case you can crop, but only in height. For that use
the "crop to current height" option.
Also, care must be taken to not move the spectrometer
or it will throw the calibration off. If you are
confident that your spectrometer
is secure, this would be the best option.
In the quick-start
guide, the system was calibrated with two maximums.
To calibrate with more maximums according to the
above table, follow the same procedure, but now
press the third and fourth buttons for those lines
you wish to use. You also have the option to
calibrate with respect to more than one image.
Perhaps you have one image that has one line you
want to use and another image that has the rest. The
procedure is the same as the quick start. Just go to
the tab of the image you want to use and select the
line.
For convenience, some of the CFL lines and their
wavelengths have been listed in the calibration
lines box. You may add whatever lines you wish and
also save them in the list. Either entering them
during calibration or before by going to the option
"Calibration->edit calibration lines".
If you want to add a description of the line you are
using to go with the value (in nm) follow the format
of : <the number> space <description> as
you see with the ones already added. If you choose
to save them to the list, they will be available
every time you start the program unless deleted.
Examining maximums.
After selecting the lines you want to calibrate
against and choosing the appropriate calibration
option. You can now touch on any maximum and a
dialog will pop up showing you the wavelength of
that line and some elements that emit within 0.5, 1
,2 or 3 nm of that wavelength. You can also generate
a pdf report of this spectrum by going "Image->generate
report". [report
function only in paid version]
The data for the elements emission wavelengths are
extracted from the data sheets compiled by the National Insitute of
Standards and Technology.
Settings
There are three settings that you can modify for
image quality under the settings option. Each one of
them gives you the option to change this value
globally (which will automatically save it for each
time you run the program) or you can select it to
change it just for this tab. After changing the
settings, the affected images will be updated to
reflect these new values, and any calibration lines
on them will be removed. Note however, that the
curves for total and color intensities will be
unaffected as they are plots derived from the raw
data.
1. Smoothing
This will smooth the curve. This is meant to
compensate for fluctuations in the camera. Some of
the extra maximums will be removed. The higher the
number chosen, the larger the smoothing.
2. Minimum Intensity
Intensities below the chosen value will be set to
zero.
3. Range
The spectrum for each row on the image has a
corresponding intensity curve and maximums. In order
to help compensate for spurious fluctuations, the
option is provided that the maximums found can be
determined from the average of all or a subset of
the rows. The software will also try to compensate
if the spectrum lines are not completely vertical
(it is a good idea however to take care in the
construction of the spectrometer to make them as
vertical as possible). If a maximum was only found
on a few of the rows, but not present on the vast
majority of them being considered, this maximum will
be ignored.
If the value of 1 is chosen for the range, none of
the averaging will take place. The row chosen will
be the center row.
If you choose smoothing=0, minimum intensity =0, and
range =1, there will be a very large number of
maximum lines and they will correspond to all the
maximums seen on total intensity curve.
Application
Notes:
1. The camera has been tested
on a Samsung Galaxy Tab 3 running Android
4.1.2 with no issues. It also ran well on
stock Android 4.4. However, it crashed under
Samsung's modified version of 4.4 for the
Galaxy. At this point, while the matter is
under investigation, consider the camera
functionality experimental which may or may
not work on your android version.
2. On some versions of android, LightSpectra
will not switch properly if you:
-
switch apps,
-
then press home,
-
then press the app again.
To guarantee that the program switches back
properly, please use an app switcher instead.
Camera Disclaimer
The camera
part of this app is based on the QT example "declarative-camera"
using QML. It is free to use provided the information below is
attached in the documentation.
License Disclaimer
LightSpectra and LightSpectraLITE are built using the open source version of Qt 5.3.1.
This version of Qt is distributed under the Lesser GNU public license reproduced below:
GNU LESSER GENERAL PUBLIC LICENSE
Version 3, 29 June 2007
Copyright (C) 2007 Free Software Foundation, Inc. <http://fsf.org/>
Everyone is permitted to copy and distribute verbatim copies
of this license document, but changing it is not allowed.
This version of the GNU Lesser General Public License incorporates
the terms and conditions of version 3 of the GNU General Public
License, supplemented by the additional permissions listed below.
0. Additional Definitions.
As used herein, "this License" refers to version 3 of the GNU Lesser
General Public License, and the "GNU GPL" refers to version 3 of the GNU
General Public License.
"The Library" refers to a covered work governed by this License,
other than an Application or a Combined Work as defined below.
An "Application" is any work that makes use of an interface provided
by the Library, but which is not otherwise based on the Library.
Defining a subclass of a class defined by the Library is deemed a mode
of using an interface provided by the Library.
A "Combined Work" is a work produced by combining or linking an
Application with the Library. The particular version of the Library
with which the Combined Work was made is also called the "Linked
Version".
The "Minimal Corresponding Source" for a Combined Work means the
Corresponding Source for the Combined Work, excluding any source code
for portions of the Combined Work that, considered in isolation, are
based on the Application, and not on the Linked Version.
The "Corresponding Application Code" for a Combined Work means the
object code and/or source code for the Application, including any data
and utility programs needed for reproducing the Combined Work from the
Application, but excluding the System Libraries of the Combined Work.
1. Exception to Section 3 of the GNU GPL.
You may convey a covered work under sections 3 and 4 of this License
without being bound by section 3 of the GNU GPL.
2. Conveying Modified Versions.
If you modify a copy of the Library, and, in your modifications, a
facility refers to a function or data to be supplied by an Application
that uses the facility (other than as an argument passed when the
facility is invoked), then you may convey a copy of the modified
version:
a) under this License, provided that you make a good faith effort to
ensure that, in the event an Application does not supply the
function or data, the facility still operates, and performs
whatever part of its purpose remains meaningful, or
b) under the GNU GPL, with none of the additional permissions of
this License applicable to that copy.
3. Object Code Incorporating Material from Library Header Files.
The object code form of an Application may incorporate material from
a header file that is part of the Library. You may convey such object
code under terms of your choice, provided that, if the incorporated
material is not limited to numerical parameters, data structure
layouts and accessors, or small macros, inline functions and templates
(ten or fewer lines in length), you do both of the following:
a) Give prominent notice with each copy of the object code that the
Library is used in it and that the Library and its use are
covered by this License.
b) Accompany the object code with a copy of the GNU GPL and this license
document.
4. Combined Works.
You may convey a Combined Work under terms of your choice that,
taken together, effectively do not restrict modification of the
portions of the Library contained in the Combined Work and reverse
engineering for debugging such modifications, if you also do each of
the following:
a) Give prominent notice with each copy of the Combined Work that
the Library is used in it and that the Library and its use are
covered by this License.
b) Accompany the Combined Work with a copy of the GNU GPL and this license
document.
c) For a Combined Work that displays copyright notices during
execution, include the copyright notice for the Library among
these notices, as well as a reference directing the user to the
copies of the GNU GPL and this license document.
d) Do one of the following:
0) Convey the Minimal Corresponding Source under the terms of this
License, and the Corresponding Application Code in a form
suitable for, and under terms that permit, the user to
recombine or relink the Application with a modified version of
the Linked Version to produce a modified Combined Work, in the
manner specified by section 6 of the GNU GPL for conveying
Corresponding Source.
1) Use a suitable shared library mechanism for linking with the
Library. A suitable mechanism is one that (a) uses at run time
a copy of the Library already present on the user's computer
system, and (b) will operate properly with a modified version
of the Library that is interface-compatible with the Linked
Version.
e) Provide Installation Information, but only if you would otherwise
be required to provide such information under section 6 of the
GNU GPL, and only to the extent that such information is
necessary to install and execute a modified version of the
Combined Work produced by recombining or relinking the
Application with a modified version of the Linked Version. (If
you use option 4d0, the Installation Information must accompany
the Minimal Corresponding Source and Corresponding Application
Code. If you use option 4d1, you must provide the Installation
Information in the manner specified by section 6 of the GNU GPL
for conveying Corresponding Source.)
5. Combined Libraries.
You may place library facilities that are a work based on the
Library side by side in a single library together with other library
facilities that are not Applications and are not covered by this
License, and convey such a combined library under terms of your
choice, if you do both of the following:
a) Accompany the combined library with a copy of the same work based
on the Library, uncombined with any other library facilities,
conveyed under the terms of this License.
b) Give prominent notice with the combined library that part of it
is a work based on the Library, and explaining where to find the
accompanying uncombined form of the same work.
6. Revised Versions of the GNU Lesser General Public License.
The Free Software Foundation may publish revised and/or new versions
of the GNU Lesser General Public License from time to time. Such new
versions will be similar in spirit to the present version, but may
differ in detail to address new problems or concerns.
Each version is given a distinguishing version number. If the
Library as you received it specifies that a certain numbered version
of the GNU Lesser General Public License "or any later version"
applies to it, you have the option of following the terms and
conditions either of that published version or of any later version
published by the Free Software Foundation. If the Library as you
received it does not specify a version number of the GNU Lesser
General Public License, you may choose any version of the GNU Lesser
General Public License ever published by the Free Software Foundation.
If the Library as you received it specifies that a proxy can decide
whether future versions of the GNU Lesser General Public License shall
apply, that proxy's public statement of acceptance of any version is
permanent authorization for you to choose that version for the
Library.